Build a Bat Box
Interstate Commission on the Potomac River Basin

What is a Bat Box?
Not all bats spend their days roosting in caves. Some roost in trees, abandoned mines, buildings, bridges and many other locations. Actually, the variety of bat roosts reflects the amazing diversity of bat species. Bats are highly opportunistic and have adapted to their environments in creative ways to take advantage of the many shelters available to them. However, humans moving into or using areas where bats live often modify or destroy their habitats and roosts.
A bat box is a man-made roost for bats. It is a way to provide valuable shelter for the only species of flying mammal—a group of species that is in decline in the United States.
Why Should I Create a Bat Box?
Bats are an important part of our ecosystem. North American bats are primarily insectivorous and, where they are present, they provide an important check to insect populations. For example, a single little brown bat can catch up to 1,200 mosquito-sized insects in an hour! However human activities (both inadvertent and purposefully) have caused drastic reductions in bat populations in recent years. These misunderstood animals are a keystone species—if the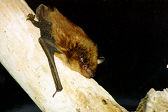 y disappear, there will be permanent changes to the ecosystem.
By putting up a bat house you will help bats find a home. You will also benefit from having fewer yard and garden pests and will enjoy learning about bats and sharing your knowledge with friends and family. Bat boxes are a real bonus for bats because they give the animals a shelter from predators and the elements and provide them a place to care for their young.
Developing Your Goals and Budget
Creating a bat box is not very expensive, however the costs can add up if you are trying to create many of them! Your goals for creating bat boxes will in part determine the costs.
Goals
You may be building bat boxes just for the members of your organization, or for a local park, or you may be reaching out to a specific audience such as schools in your watershed. Whatever the case, you will want to write out your specific goals and let them guide your work plan.
Some example goals:
- Increase the population of bats historically found in your watershed or community
- Enhance community awareness of habitat decline due to increased human activity and presence in the area
- Foster environmental stewardship and an interest in science by students, teachers, administrators, and members of the community
Budget
The cost of creating a bat boxes is quite low. In fact the cost of the tools needed to create a bat box is greater than the cost of a bat box itself. If you are building one bat box, a hand saw, twenty to thirty screws and ten or so nails (or wood glue), a quarter sheet of plywood, a 1×2” pine board, some caulk and a caulk gun, and some water-based stain and 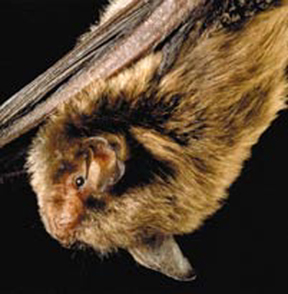 brushes are all that are necessary. If you are building several bat boxes, you will probably want to use a table or circular saw instead of a hand saw.
The cost of materials for a bat box can vary between ten and twenty dollars, depending on the options you choose in building. The cost of tools could be upwards of $250.00, depending on the tools you decide to purchase.
There are many ways to finance a bat box project. The simplest method of cost cutting is to cut material costs by using leftover lumber. You can also partner with a lumber yard to get new or scrap lumber donated.
As previously noted, tools are the primary cost of building bat boxes. You can cut these costs by asking members of your organization or friends to lend you their tools for the project. You can also ask your local high school wood shop class if they would be willing to donate their time to help cut lumber to prepare the bat boxes.
If you are in need of funding for your project, you can also ask the recipients of the bat boxes to make a donation or you can seek out grants. The Home Depot and Walmart offer grants for community environmental projects such as these. You might also try the Chesapeake Bay Trust (MD) and the Chesapeake Bay Restoration Fund (VA) or other environmental grant making organizations in your jurisdiction.
Steps for Creating a Bat Box
Below is a sample timeline for a bat box project where individuals will be building their own boxes and the materials and tools will be provided by your organization:
- Determine the target area for the bat boxes based on species need
- Order materials from supplier
- Arrange for a location to store and build the bat boxes
- Arrange for materials to be delivered or to pick up the materials (NOTE: this may be an additional cost)
- Purchase or arrange to borrow needed tools
- Advertise the bat box construction day through as many outlets as possible
- Create and print steward’s manual/educational materials
- Host bat box construction day
- Arrange site visits to make sure that the bat boxes are properly installed and/or to help install them
Advertising your Bat Box Project
There are lots of ways to advertise for an event and, unfortunately, no one way works consistently. For this reason, rather than walk through step by step, we have suggested several options for you to choose from. The best outreach campaigns make use of several techniques and only you can know what is best for your project. Advertising options include:
- Creating and distributing door hangers to target a specific neighborhood where you would like to work
- Creating and distributing a press release to your local paper, radio stations and/or television stations (see the Resources section for information on how to write and distribute a press release)
- Creating flyers and placing them in public libraries, recreation centers, and walking trails
- Developing a web site or social media campaign
- Running an advertisement in a local paper, or on radio stations and/or television stations
- Discussing the event at targeted community association, church group, youth group, and/or service organization meetings
- Advertising your event on free on-line environmental calendars such as the Chesapeake Network
- Send out an email to people you think would be interested and asking them to tell their friends as well
- Send out a mass mailing to your targeted audience
- Organizing a Bat Box Construction and/or Distribution Day
- Create and promote the event on social media
It is not enough to have the construction materials for your bat boxes ready for your event—some final preparations will make your construction/distribution day a success.
Construction
In advance of your event make sure that you have:
- Enough tools to share among participants without creating long waits
- Refreshments and snacks if possible or at least provide water
- A sign in sheet
- Printed out directions for constructing the bat boxes (with diagrams if possible)
- Construct a bat box for demonstration purposes
- Done as much prep work for each bat box as possible—for example, put all the parts together with each box or pre-cut the wood for the box
- Called key volunteers and asked them to arrive early and be Team Leaders
- Organized stations or groups so that volunteers can be teamed up with Team Leaders to assemble their bat boxes
- Put together an emergency medical kit and set up an emergency plan in case of an accident
- Made sure that bathroom facilities are available for volunteers
- Contacted local newspapers
- Designated a volunteer to take photos of the event
Distribution/Installation
- Set aside a bat box to demonstrate proper installation
- Find the proper habitat near your distribution site where you can demonstrate installation
- Prepare the installation site so that the demonstration will go quickly and smoothly
- Create and print instructions for installing the bat box (with diagrams if possible)
- Recruit volunteers to visit homes to help install the bat boxes and/or to make sure that bat boxes are properly installed
Creating a Bat Box
There are several steps to constructing a bat box from scratch. Ideally, the first three steps below would be completed before the volunteers assemble the bat boxes in order to save time and to minimize the number of people using potentially dangerous tools.
Materials
Of all the available building materials, wood is about as good as you can get. It’s durable, has good insulating qualities, and it breathes. Pine and exterior grade plywood are recommended because they are easy to work with and they resist weathering. The exact dimensions of wood and other materials you need are as follows:
- 1/4 sheet ( 2′ x 4′ ) 1/2″ AC, BC, or T1-11 (outdoor grade) plywood. DO NOT use pressure treated wood.
- One piece 1″ x 2″ (3/4″ x 1 1/2″ finished) x 8′ pine (furring strip)
- 20-30 1 1/4″ coated deck or exterior-grade Phillips screws
- One pint dark, water-based stain, exterior-grade
- One pint water-based primer, exterior-grade
- One quart flat water-based paint or stain, exterior-grade
- One tube paintable latex caulk
- 1″ x 3″ x 28″ board for roof
- Black asphalt shingles or galvanized metal (optional)
- 6-10 7/8″ roofing nails (optional)
- Tools
- Hand saw, table saw or circular saw
- Hand Drill
- Screwdriver or screwdriver drill bit
- Hammer
- Caulking gun
- Tape measure
- Paint brushes
- Scissors (optional)
- Staple gun (optional)
Design
How elaborate you make your bat box depends on your personal sense of aesthetics. For the most part, all the bats care about is their safety and the right 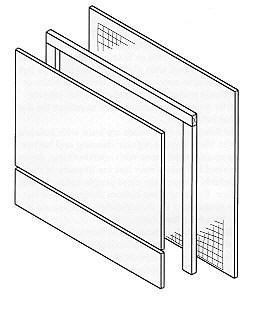 dimensions. The design included below is for a small economy bat box that will house approximately 50 bats. Larger box designs are available and may work better in colder climates.
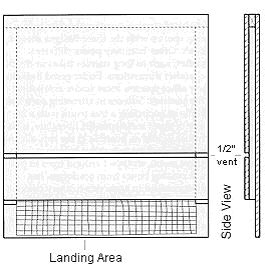
- Measure and Cut the plywood pieces. The plywood should be cut into three pieces: one 26 1/2″ x 24″, a second 16 1/2″ x 24″, and a third of 5″ x 24″.
- Roughen inside of backboard and landing area. The easiest way roughen these areas is by cutting horizontal grooves with a knife or saw. Space grooves about 1/2″ apart, cutting 1/16″ to 1/32″ deep.
- Measure and cut furring strips and the roof board. The furring strips are the strips that make the gaps between the pieces of plywood. They should be cut into one 24″ and two 20 1/4″ pieces. The roof board should measure 1″ x 3″ x 28″
- Apply two coats of stain to interior surfaces. Use dark, water-based stain. Do not use paint, as it will fill grooves, making them unusable.
- Attach furring strips to the backboard. Attach the strips using caulking. Start with 24″ piece at top and then do the side pieces. The roosting chamber will be 3/4″ wide (front to back). After attaching the strips with caulking, screw the pieces together for added stability.
- Attach front to furring strips. Attach the top piece first (don’t forget to caulk). Leave 1/2″ vent space between top and bottom front pieces. Again, screw the newly caulked boards together.
- Caulk around all outside joints. This caulking will further seal roosting chamber.

- Attach the roof board. Attach the 1″ x 3″ x 28″ board to the top as a roof using caulking and then screwing the roof to the top of the box.
- Paint or stain exterior. This step should be repeated three times using primer for first coat.
- Cover the roof with shingles or galvanized metal. This step is optional.
Optional Modifications to your Bat Box
Wider bat houses can be built for larger colonies. Be sure to adjust dimensions for back and front pieces and ceiling strip. A 3/4″ support spacer may be required in the center of the roosting chamber for bat houses over 24″ wide to prevent warping.
Two bat houses can be placed back to back, mounted on poles. Before assembly, a horizontal 3/4″ slot should be cut in the back of each house about 9″ from the bottom edge of
the back piece to permit movement of bats between houses. Two pieces of wood, 1″ x 4″ x 4 1/4″, screwed horizontally to each side, will join the two boxes. To provide additional roosting space, leave a 3/4″ space between the two houses, and roughen the wood surfaces or cover the back of each with plastic mesh. (Do not cover the rear exit slots; see item 4 below).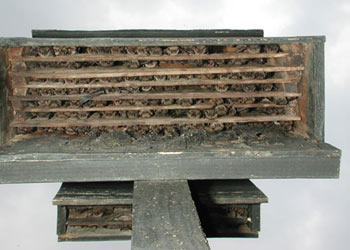
One 1″ x 4″ x 34″ vertical piece attached to each side over the horizontal pieces blocks light, but allows bats and air to enter. A galvanized metal roof, covering both houses, protects the center roosting area from rain. Eaves should be about 3″ in southern areas and about 1 1/2″ in the north.
Ventilation may not be necessary in cold climates. In this case, the front should be a single piece 23″ long. Smaller bat houses like this one will be less successful in cool climates. However, those mounted on buildings gain heat faster, maintain thermal stability better and are more likely to attract bats.
Durable plastic mesh can be substituted for roughening to provide footholds for bats. Attach one 20″ x 24 1/2″ piece to backboard after staining interior, but prior to assembly.
Installing Your Bat Box
The installation process is just as important as the construction process. A bat box can be solidly constructed, but it will not attract bats if it is not properly located and installed. Where you put your bat box is as important as its design and construction. Bats are very particular about where they live. No matter how perfect your bat box, if you don’t have the right habitat, the bats aren’t likely to find it. Finally, not everyone has the habitat for bats. Here are some tips on where to place your bat box:
The bat box should be:
- Erected at least 10 feet off the ground
- Placed in an open area where it gets at east 7 hours of direct sun
- Placed within 1⁄4 mile of water source
- Within 10—30 yards of cover (bats are vulnerable to predation when exiting)
- Located in good foraging habitat containing forests, clearings, and wetlands with abundant insect activity
- If an existing bat roost is nearby, bats may or may not use the box, but they will be aware of box availability should anything happen to the existing roost
- In Potomac basin, boxes should be oriented southeast or southwest
The bat box should not be:
- Erected in a shaded location, unless trying to attract intermittent use by several bachelor or non-breeding females
- Located over bright substrate, which will reflect light up into box
- Placed near burn barrels where smoke will disturb bats
- Erected where the box is prone to vandalism
- Erected directly over highways. Bats swarm the roosts during the dawn return and are vulnerable to automobile traffic
- Placed in brightly lighted areas
Maintaining Your Bat Box
Maintaining a bat box is easy! For the most part, bat boxes are maintenance free, however occasionally they might attract unwanted guests. Open-bottom designs are less likely to be occupied by birds, mice, or squirrels, however they may sometimes become infested with wasps. Paper wasps may build nests in partitions if they are less than three-quarters of an inch thick. Mud daubers are seldom aggressive and have weak stings. Nests of both species can be knocked down in spring with a high pressure water hose.
Resources
- Sample Liability Waiver
- Sample Press Release
- Sample Sponsor Letter
- BatWorlds
- Why do Some Bat Houses Fail?
- Video—Build a Bat House: Step by Step
- LiveScience—Facts About Bats
- KidZone—Bat Facts
- Merlin Tuttle’s Bat Conservation—Selecting a Quality Bat House

